
THE 5 EASY WAYS TO SPEED UP WINDOWS 11 RIGHT NOW
Category: Windows Tips | Reading time: ~ 8 minutes | Easy: Beginner
If your Windows 11 PC has been feeling sluggish lately — apps taking forever to open, the Start menu lagging, or your computer crawling to life at startup — you are not alone. This is one of the most common complaints from Windows users, and the good news is: it is usually very fixable.
Windows 11 is a powerful, modern operating system, but over time it accumulates a lot of digital clutter. Background apps quietly consume your RAM. Temporary files pile up on your hard drive. Startup programs multiply without you noticing. Fancy visual animations eat into your processor’s resources. All of these things combine to make your PC feel slower than it actually is.
The even better news? You do not need to be a tech expert to fix any of this. The five methods in this guide are all built into Windows 11 itself — no downloads, no paid software, no complicated settings. Each step comes with clear, plain-English instructions so you can follow along at your own pace.
By the time you finish reading this guide, you will know exactly how to:
- Disable the startup apps that are secretly slowing down your boot time
- Clear out junk files and cache that are clogging up your drive
- Turn off heavy visual animations to get an instantly snappier feel
- Switch your power settings to unlock your PC’s full performance potential
- Control background apps that drain your RAM without your knowledge
Let’s get into it.
TIP 1 : DISABLE UNNECESSARY STARTUP APPS
Why This Matters?
Every time you turn on your computer, Windows 11 does not just load the operating system — it also quietly launches every app that has been set to start automatically. Think about it: your music app, your cloud storage sync tool, your gaming launcher, your messaging apps. Over time, as you install more software, this list grows and grows.
The result? Your computer is doing ten things at once the moment you switch it on, before you have even had a chance to open a single browser tab. This is one of the biggest causes of slow startup times, and it is one of the easiest things to fix.
How to Do It — Step by Step
- Open Task Manager: Right-click anywhere on your taskbar (the bar at the bottom of your screen) and select Task Manager from the menu that appears. Alternatively, press
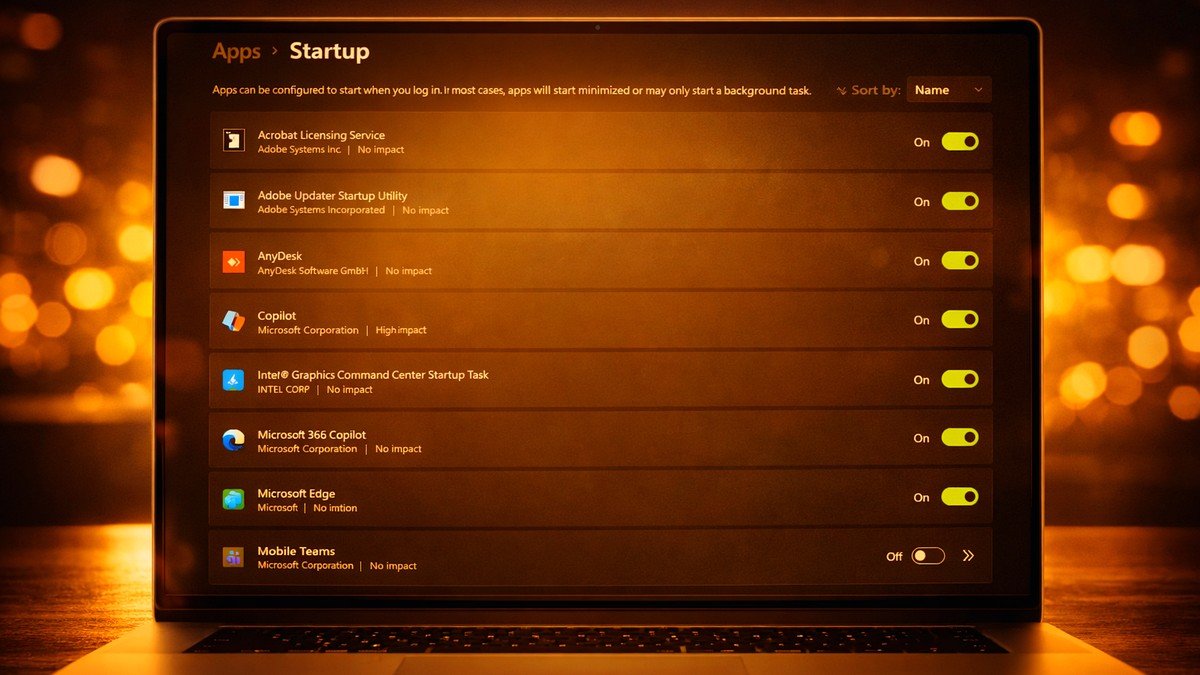
Ctrl + Shift + Escon your keyboard. - Go to the Startup Apps tab: In Task Manager, look along the left sidebar or top menu for the Startup Apps icon (represented by a small speedometer or puzzle piece icon). Click it.
- Check the Startup impact column: You will see a list of apps with a column labelled Startup impact. Apps marked as High are the main culprits consuming your boot time.
- Disable the apps you don’t need at startup: Right-click any app you do not need running the moment your computer turns on, and select Disable. This does not uninstall or delete the app — it just stops it from automatically launching at startup. You can still open it manually whenever you want.
Which apps are safe to disable?
Apps like Spotify, Discord, Steam, OneDrive (if you don’t rely on automatic sync), Zoom, Teams, and browser helpers are all safe to disable from startup. Do NOT disable anything labelled as a Windows Security, antivirus, or driver-related app — these are important for your system’s health.
What to Expect
After disabling high-impact startup apps, most users notice their computer boots noticeably faster — sometimes cutting startup time by 30 to 60 seconds or more. The effect is especially dramatic on older machines or those with a traditional hard drive (HDD) rather than a solid-state drive (SSD).
TIP 2: CLEAR JUNK FILES AND CACHE
Why This Matters
Think of your computer’s hard drive like a physical desk. When the desk is clear and organised, you can find things quickly and work efficiently. But when it is covered in old papers, sticky notes, and half-finished projects you never threw away, everything takes longer.
Windows 11 creates temporary files constantly — when it installs updates, when apps run, when you browse the internet. These files are supposed to be cleaned up automatically, but often they are not. Over time, they accumulate into gigabytes of digital clutter that slows down file access, takes up valuable storage space, and in some cases causes apps to load more slowly.
Method 1: Using Windows Disk Cleanup
- Open Disk Cleanup: Click the Start button (the Windows logo at the bottom of your screen), type Disk Cleanup into the search bar, and press Enter.
- Select your drive: A small window will appear asking which drive to clean. Select your main drive (usually labelled C:) and click OK. Windows will spend a moment calculating how much space can be freed.
- Choose what to delete: You will see a list of file types with checkboxes. Safe ones to tick include: Temporary Internet Files, Windows Update Cleanup, Temporary Files, Recycle Bin, Delivery Optimization Files, and Thumbnails.
- Run the cleanup: Click OK, then click Delete Files to confirm. Windows will permanently delete the selected items. This process may take a few minutes.
Method 2: Turn on Storage Sense
Storage Sense is a built-in Windows 11 feature that automatically deletes junk files on a regular schedule, so you never have to do it manually again. Do this:
- Open Settings: Press
Windows key + Ito open the Settings app. - Go to Storage: Navigate to System > Storage.
- Enable Storage Sense: Toggle on the Storage Sense switch. You can also click on it to customise how often it runs (daily, weekly, or monthly).
Method 3: Clearing Your Browser Cache
Do this in whichever browser you use most:
- Chrome / Edge: Press
Ctrl + Shift + Delete, set the time range to “All time,” check Cached images and files, and click Clear data. - Firefox: Press
Ctrl + Shift + Delete, select Everything for the time range, check Cache, and click Clear Now.
How much space can you free up?
On a PC that has never been cleaned, it is not unusual to recover 5 to 20 GB of space using these methods. For machines with smaller SSDs (128 GB or 256 GB), this can make a meaningful difference to both speed and available storage.
TIP 3: TURN OFF VISUAL ANIMATIONS AND EFFECTS
Why This Matters
Windows 11 is one of the most visually polished versions of Windows ever released. Windows fade in and out smoothly. Menus animate open with a gentle slide. The taskbar has frosted glass effects. It all looks very sleek — but it comes at a cost.
Every one of those animations requires your CPU and GPU to do extra work. On a high-end gaming PC with a powerful graphics card, that is no big deal. But on an older laptop, a budget PC, or a machine with limited RAM, these animations can make the entire interface feel sluggish and unresponsive. Turning them off is one of the fastest ways to get a noticeably snappier feel.
How to Do It — Step by Step.
- Open Advanced System Settings: Click the Start button and type Adjust the appearance and performance of Windows into the search bar. Click the exact system control panel result that appears.
- Choose your performance option: In the Performance Options window, you will see three configuration options. Select Adjust for best performance to turn off all animations at once. This gives you maximum execution speed.
- Or pick and choose: If you find the “best performance” option looks too bare, select Custom instead. From the list of checkboxes below, you can re-enable just the ones that matter most to you.
Recommended middle-ground settings to keep enabled:
If you want some visual polish without the performance cost, keep these enabled: “Smooth edges of screen fonts” (makes text clearer), “Show thumbnails instead of icons” (useful in File Explorer), and “Show shadows under windows” (helps your eyes distinguish overlapping windows). Turn off everything else.
What to Expect
The difference is immediate and noticeable. Menus open instantly. The Start menu responds faster. Windows snap into place rather than sliding around. For older PCs, this single change can make the computer feel brand new.
OPTIMIZE WINDOWS 11 POWER PLAN FOR MAXIMUM HIGH PERFORMANCE
Why This Matters
By default, Windows 11 uses a “Balanced” power plan. This plan is designed to save electricity on desktops and stretch battery life on laptops. To achieve this, it dynamically slows down your processor when you aren’t doing heavy work.
While great for saving power, it can cause tiny split-second micro-lags when you open an application because your processor has to wait to speed itself back up. Switching to a high-performance setting tells your processor to remain awake and ready to unleash full power instantly.
How to Do It — Step by Step
- Open Settings: Press Windows key + I on your keyboard to open your Settings dashboard.
- Navigate to Power Settings: Go to System on the left menu, then click on Power & battery on the right side.
- Change the Power Mode: Look for the dropdown menu next to Power mode. Change it from Balanced to Best performance.
A Quick Laptop Note:
Running your PC on “Best performance” mode will drain your laptop battery slightly faster. If you travel frequently, remember to slide this back to Balanced when working away from a wall plug.
What to Expect
Your CPU will no longer artificially bottleneck itself to save micro-watts of power. You will notice that application launches are more reliable, heavier multi-tasking feels smoother, and demanding software encounters significantly fewer hiccups.
TIP 5: CLOSE DOWN HIDDEN BACKGROUND APPLICATIONS
Why This Matters
Just because you closed an application window does not mean the application actually stopped working. Many programs continue to live inside your system tray, running hidden software tasks in the background.
When dozens of apps are silently synchronizing data, looking for updates, or tracking system metrics simultaneously, they steal processing cycles and fill up your available RAM. If your system RAM is completely full, Windows 11 slows to a absolute crawl.
How to Do It — Step by Step
- Open Installed Apps Settings: Right-click the Windows Start menu button and select Installed apps from the hidden quick-access menu.
- Locate Background Culprits: Scroll down the list of your software. Look for apps you rarely use but know stay active (such as Cortana, regional weather widgets, or corporate communication utilities).
- Modify Advanced Options: Click the three dots (…) located next to the specific app name and click Advanced options.
- Turn off Background Permissions: Locate the heading marked Background apps permissions. Change the selection dropdown from Power optimized or always over to Never.
What to Expect
By cutting off background permissions, you prevent inactive software from hoarding system memory. This keeps your system memory free, giving your active browser tabs and system tools the space they need to breathe and operate smoothly.
CONCLUSION: ENJOY YOUR REFRESHED PC
You do not need to repeat these steps every single day. Taking five minutes every few months to audit your startup apps, clean out temporary storage, and manage your memory settings will ensure your Windows 11 system runs lean, fast, and responsive for years to come. While keeping your PC fast is important, don’t neglect your mobile devices! Read our comprehensive guide on 5 Essential Smartphone Care Tips to Extend Your Device’s Lifespan to protect your tech investments
Good and Nice post. Keep it up!
Thanks. For quality Tech News, ALWAYS come to SARITSYSTECH.
Where is you location exactly? Can you do product review for my products? Please Kindly reply via the email. Thanks.
I will respond to you via email as you requested.
Good content. What is the meaning of SARITSYSTECH? This name amazes me.
Tnanks a lot
[…] with your phone! If your desktop or laptop computer is lagging, check out our companion guide on how to speed up Windows 11 right now to boost your PC’s performance […]
Good 👍 post
Good 👍 blog post
[…] computer is lagging, stuttering, or freezing up, check out our companion performance guide on HOW TO SPEED UP WINDOWS 11 MAXIMUM HIGH PERFORMANCE to clear system clutter, fix startup lag, and boost your PC speed […]
[…] this guide on migrating Windows 11 to a new SSD, you’ll also find value in our earlier post on Speeding Up Windows 11. It covers practical optimization tips to make your system run faster, smoother, and more […]